еҸҜжҳҜпјҢжҲ‘们еҸҲжңүжҳҫзӨәжұүеӯ—зҡ„йңҖжұӮжҖҺд№ҲеҠһпјҹ
иҙҙеӣҫзүҮеҘҪеғҸд№ҹеҫҲеҚ з©әй—ҙпјҢ
жңүжІЎжңүеҸҲиғҪзңҒз©әй—ҙеҸҲеҸҜд»ҘжҳҫзӨәжұүеӯ—зҡ„ж–№жі•е‘ўпјҹ
е“Ҳе“Ҳе“ҲпјҢиҝҷз§ҚдёӨе…Ёе…¶зҫҺзҡ„дәӢеә”иҜҘжІЎжңүпјҢ
дёҚиҝҮпјҢ
еҰӮжһңжҲ‘们еҸӘжҳҜжҳҫзӨәеҮ дёӘзү№е®ҡзҡ„жұүеӯ—иҖҢдёҚжҳҜж•ҙдёӘеӯ—еә“зҡ„иҜқеҖ’жҳҜеҸҜд»ҘпјҢеӨ§е®¶еә”иҜҘе·Із»ҸжғіеҲ°дәҶпјҢйӮЈе°ұжҳҜжҠҠиҝҷеҮ дёӘзү№е®ҡзҡ„жұүеӯ—еҒҡжҲҗеӯ—еә“пјҢ然еҗҺи°ғз”Ёlcd_printfеҮҪж•°жҳҫзӨәгҖӮдёәдәҶе’Ңе®ҳж–№зҡ„еҮҪж•°еҗҚжңүжүҖеҢәеҲ«пјҢжҲ‘们е°ұиө·еҗҚдёә My_lcd_printfгҖӮ
д»ҘеҗҺе°ұеҸҜд»Ҙиҝҷж ·жҳҫзӨәжұүеӯ—дәҶпјҢеҰӮдёӢжүҖзӨә
My_lcd_text_location( 16, 2);My_lcd_printf("еөҢе…ҘејҸ%s","е°Ҹд№Ұиҷ«");жҲ‘们зҡ„еӯ—еә“иҷҪ然е°ҸпјҢдҪҶжҳҜMy_lcd_printfеҮҪж•°д№ҹеҸҜд»Ҙе®һзҺ° %s зҡ„еҠҹиғҪгҖӮ
жұүеӯ—еӯ—еә“еҲ¶дҪң
йӮЈжҲ‘们е…ҲејҖе§ӢеҲ¶дҪңеӯ—еә“гҖӮеӯ—з¬ҰеҸ–жЁЎиҪҜ件зҡ„дҪҝз”ЁжҲ‘е°ұдёҚи®ІдәҶпјҢзҪ‘дёҠжңүеҫҲеӨҡгҖӮеӯ—з¬ҰеҸ–жЁЎеҸҜд»ҘеҲҶдёәжЁӘеҗ‘еҸ–жЁЎгҖҒз«–еҗ‘еҸ–жЁЎзӯүпјҢдёәдәҶе’Ңе®ҳж–№дҝқжҢҒдёҖиҮҙпјҢжҲ‘们йҮҮз”ЁжЁӘеҗ‘еҸ–жЁЎгҖӮ
еҘҪпјҢжҲ‘们讲дёҖдёӢжҖҺд№ҲжҠҠдёҖдёӘжұүеӯ—иҪ¬жҚўжҲҗеҚҒе…ӯиҝӣеҲ¶ж•°з»„пјҢеҰӮдёӢеӣҫ
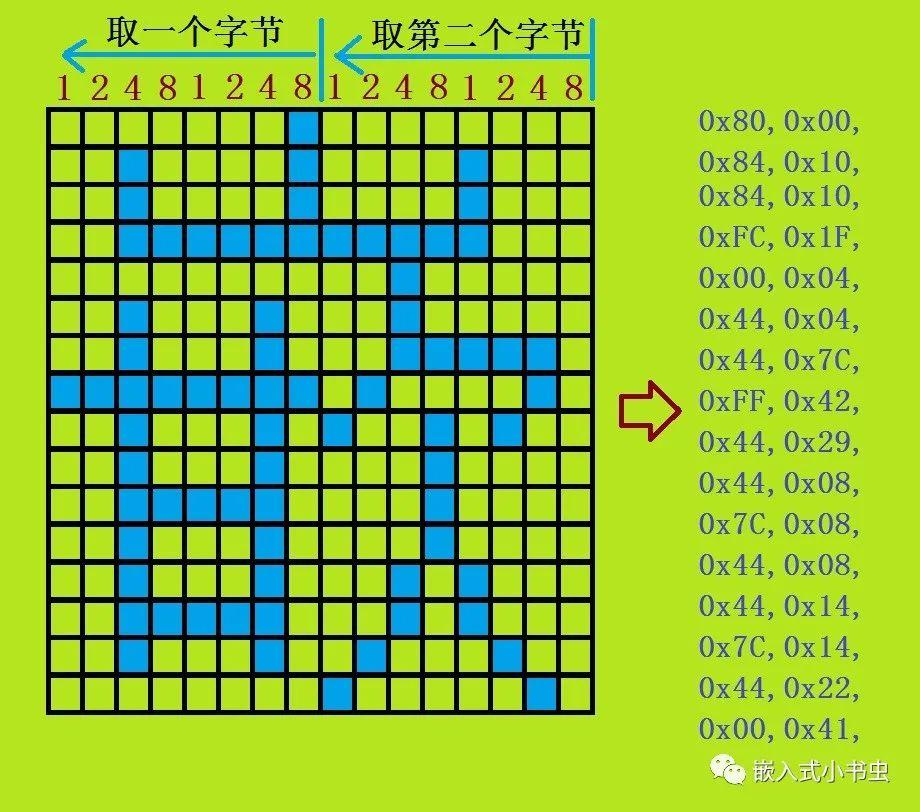
жЁӘеҗ‘еҸ–жЁЎеҺҹзҗҶеҰӮдёӢпјҢ
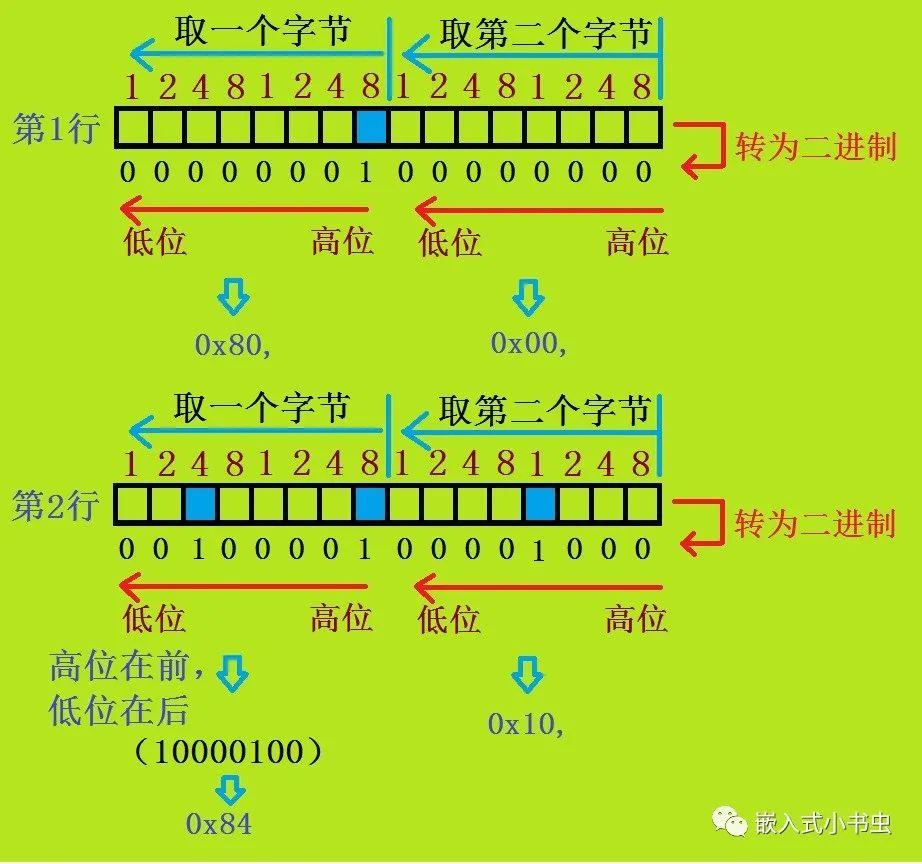
иҝҷж ·дёҖиЎҢдёҖиЎҢзҡ„иҪ¬жҚўпјҢжңҖеҗҺдҝқеӯҳеҲ°ж•°з»„дёӯе°ұжҳҜеӯ—еә“дәҶгҖӮ
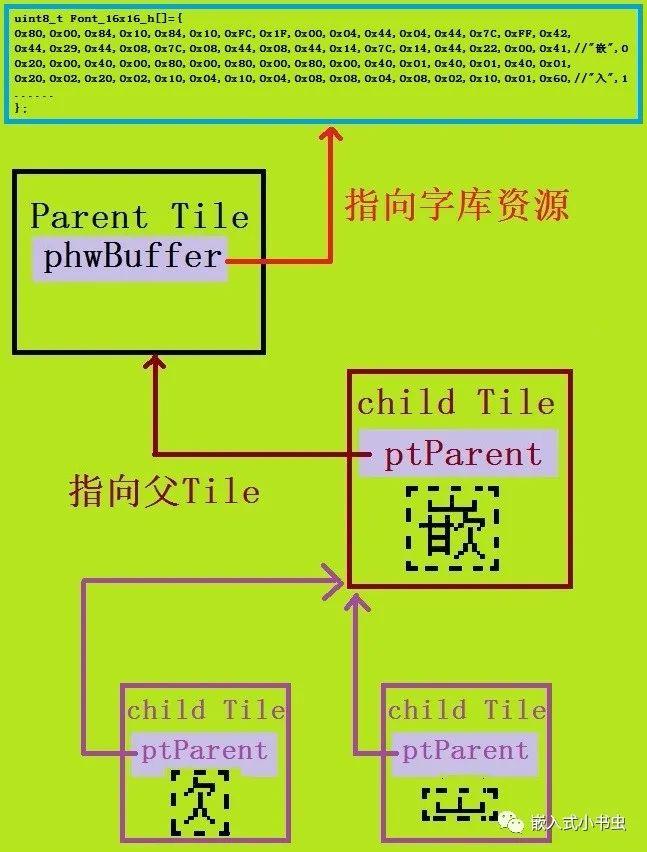
з”ЁеӯҗtileиЎЁзӨәиө„жәҗ
жҺҘдёӢжқҘи®ІдёҖдёӢеҫ…дјҡиҰҒз”ЁеҲ°зҡ„Arm-2Dзҡ„зҹҘиҜҶпјҢйӮЈе°ұжҳҜдёҠдёҖзҜҮжҲ‘们没жңүи®ІеҲ°зҡ„еӯҗTileзҡ„еҸҰдёҖз§Қз”Ёжі•пјҢиө„жәҗд№ҹеҸҜд»Ҙз”ЁеӯҗtileжқҘе»әз«ӢпјҲеҚіеҸ–дёҖдёӘеӨ§еӣҫзҡ„еұҖйғЁдҪңдёәж–°зҡ„иө„жәҗпјү
еҰӮдёӢеӣҫжүҖзӨәпјҡ

зҲ¶Tileе’ҢеӯҗTileйғҪеҸҜд»ҘеҪ“еҒҡжҳҜеӣҫзүҮиө„жәҗдҪҝз”ЁпјҢдҪҶжҳҜ他们жҳҜе…ұз”ЁеҗҢдёҖеј еӣҫзүҮиө„жәҗпјҲиҠӮзңҒз©әй—ҙпјүгҖӮ
дҪҝз”Ёж–№жі•еҰӮдёӢжүҖзӨәпјҡ
||еӣҫзүҮиө„жәҗextern const uint8_t c_bmpColours[];||зҲ¶TileпјҢжӢҘжңүе®Ңж•ҙзҡ„еӣҫзүҮиө„жәҗconst arm_2d_tile_t c_tileParent = { .tRegion = { .tSize = { .iWidth = 100, .iHeight = 100, }, }, .tInfo.bIsRoot = true, .phwBuffer = (uint16_t *)c_bmpColours,};||еӯҗTileпјҢжӢҘжңүзҲ¶Tileзҡ„йғЁеҲҶиө„жәҗconst arm_2d_tile_t c_tileChild = { .tRegion = { .tLocation = { .iX = 10, .iY = 20, }, .tSize = { .iWidth = 30, .iHeight = 30, }, }, .tInfo = { .bIsRoot = false, .bDerivedResource = true, .bHasEnforcedColour = true, .tColourInfo = { .chScheme = ARM_2D_COLOUR_16BIT, }, }, .ptParent= (arm_2d_tile_t *)&c_tileParent ,};зҲ¶Tileе’ҢеӯҗTileе…ұз”ЁеҗҢдёҖеј еӣҫзүҮиө„жәҗc_bmpColours[]
жӯӨж—¶еӯҗTileзҡ„bDerivedResourceеұһжҖ§еҝ…йЎ»дёәtrue
bHasEnforcedColourеұһжҖ§д№ҹи®ҫзҪ®дёәtrueпјҢдё”е’ҢзҲ¶Tileзҡ„йўңиүІдҝЎжҒҜиҰҒдёҖиҮҙгҖӮ
дёҠйқўиҝҷдёӘиө„жәҗеӯҗиҙҙеӣҫпјҲTileпјүе’ҢжҲ‘们иҰҒжҳҫзӨәжұүеӯ—жңүд»Җд№Ҳе…ізі»е‘ўпјҹ
жҲ‘们еҸҲдёҚжҳҫзӨәеӣҫзүҮ......
hahaha
иҝҷе°ұжҳҜArm-2Dзҡ„и®ҫи®ЎжҖқжғіпјҢе®ғжҠҠжүҖжңүзҡ„иө„жәҗйғҪзңӢжҲҗжҳҜTileпјҢеӯ—еә“д№ҹжҳҜдёҖдёӘTileпјҢиҖҢдё”жҳҜдёҖдёӘеӨ§TileпјҢиҖҢйҮҢиҫ№зҡ„дёҖдёӘеӯ—з¬Ұе°ұжҳҜд»–зҡ„дёҖдёӘеӯҗTileпјҢжүҖд»Ҙдјҡз”ЁеҲ°дёҠйқўи®ІеҲ°зҡ„еӯҗTileз”Ёжі•гҖӮ
еҰӮдёӢеӣҫпјҡ
жңүдәҶиҝҷдёӘTileжҖқжғіпјҢиҝҳеҸҜд»ҘжҠҠдёҖдёӘжұүеӯ—жӢҶжҲҗеӨҡдёӘгҖӮ
з”ЁArm-2DжҳҫзӨәжұүеӯ—зЁӢеәҸе®һзҺ°
еҘҪдәҶпјҢйӮЈжҲ‘们зҺ°еңЁе°ұеҺ»е®һзҺ°жҲ‘们зҡ„My_lcd_printfеҮҪж•°пјҢеҰӮдёӢ
int My_lcd_printf(const char *format, ...){ int real_size; static char s_chBuffer[MAX(((GLCD_WIDTH/6)+1), 54)]; __va_list ap; va_start(ap, format); real_size = vsnprintf(s_chBuffer, sizeof(s_chBuffer)-1, format, ap); va_end(ap); real_size = MIN(sizeof(s_chBuffer)-1, real_size); s_chBuffer[real_size] = '\0'; ||жҳҫзӨәеӯ—з¬ҰдёІ lcd_puts_chinese(s_chBuffer); return real_size; }жҳҜдёҚжҳҜзңӢеҲ°дәҶжҲ‘们зҶҹжӮүзҡ„CиҜӯиЁҖеҸҜеҸҳй•ҝеҸӮж•°дҪҝз”Ёзҡ„е®ҸпјҲ__va_listгҖҒva_startгҖҒva_endпјү
иҝҳдёҚзҹҘйҒ“他们жҖҺд№Ҳз”Ёзҡ„иҜ·зңӢдёӢйқўиҝҷзҜҮж–Үз«
жҠҠж јејҸеҢ–еҘҪзҡ„еӯ—з¬ҰдёІж”ҫеҲ°дәҶs_chBufferйҮҢпјҢ然еҗҺи°ғз”Ёlcd_puts_chineseеҮҪж•°гҖӮ
йӮЈжҺҘдёӢжқҘжҲ‘们е®һзҺ°lcd_puts_chineseеҮҪж•°пјҢеҰӮдёӢ
void lcd_puts_chinese(const char *str){ while(*str) { ||и®Ўз®—еӯ—з¬ҰеңЁеұҸ幕дёӯжҳҫзӨәзҡ„еқҗж Ү int16_t iX = s_tLCDTextControl_su.tTextLocation.chX * GLCD_Font_16x16.width; //int16_t iY = s_tLCDTextControl.tTextLocation.chY * GLCD_Font_16x16.height; ||з»ҳеҲ¶дёҖдёӘжұүеӯ— mylcd_draw_char( s_tLCDTextControl_su.tRegion.tLocation.iX + iX, s_tLCDTextControl_su.tRegion.tLocation.iY, get_chinese_index(str)); |||еҸіз§»дёҖдёӘеӯ—з¬Ұзҡ„еқҗж ҮпјҢж–№дҫҝдёӢдёӘжұүеӯ—жҳҫзӨә s_tLCDTextControl_su.tTextLocation.chX++; ||дёҖдёӘжұүеӯ—еҚ дёӨеӯ—иҠӮпјҢжүҖд»ҘиҰҒеҠ 2 str+=2; }}
uint8_t get_chinese_index(const char* chChar){ uint8_t num = 0; if(0 == strncmp(chChar,"еөҢ",2)){ //num = 0; }else if(0 == strncmp(chChar,"е…Ҙ",2)){ num = 1; }else if(0 == strncmp(chChar,"ејҸ",2)){ num = 2; }else if(0 == strncmp(chChar,"е°Ҹ",2)){ num = 3; }else if(0 == strncmp(chChar,"д№Ұ",2)){ num = 4; }else if(0 == strncmp(chChar,"иҷ«",2)){ num = 5; } return num;}еңЁжӯӨеҮҪж•°дёӯи®Ўз®—еӯ—з¬ҰеңЁеұҸ幕дёӯжҳҫзӨәзҡ„еқҗж ҮпјҲiXпјҢiYпјүпјҢ然еҗҺдј дәәmylcd_draw_charеҮҪж•°дёӯгҖӮ
жіЁж„ҸжҲ‘们еӨҡдәҶдёҖдёӘеҮҪж•° get_chinese_indexпјҢеӣ дёәжҲ‘们зҡ„жұүеӯ—еӯ—еә“еҸӘжңүеҮ дёӘеӯ—иҖҢдёҚжҳҜж•ҙдёӘжұүеӯ—еӯ—еә“пјҢжүҖд»ҘиҺ·еҸ–дёҖдёӘжұүеӯ—еңЁеӯ—еә“дёӯзҡ„дҪҚзҪ®йңҖиҰҒиҮӘе·ұе®һзҺ°пјҢжӯЈеёёж•ҙдёӘжұүеӯ—еӯ—еә“зј–з ҒжҳҜжҢүдёҖе®ҡйЎәеәҸжҺ’ж”ҫзҡ„пјҢдёӢж ҮеҫҲе®№жҳ“и®Ўз®—гҖӮ
жңҖеҗҺе®һзҺ°жҲ‘们зҡ„mylcd_draw_charеҮҪж•°пјҢеҰӮдёӢ
static void mylcd_draw_char(int16_t iX, int16_t iY, char chChar){ ||жҳҫзӨәеҲ°й»ҳи®Өзј“еҶІеҢә //! use default frame buffer arm_2d_tile_t *ptFrameBuffer = (arm_2d_tile_t *) -1; ||зҲ¶TileпјҢжұүеӯ—еӯ—еә“иө„жәҗ const static arm_2d_tile_t s_tileFont16x16 = { .tRegion = { .tSize = { .iWidth = 16, .iHeight = 16 * 9, }, }, .tInfo = { .bIsRoot = true, .bHasEnforcedColour = true, .tColourInfo = { .chScheme = ARM_2D_COLOUR_BIN, }, }, .pchBuffer = (uint8_t *)Font_16x16_h, }; ||еӯҗTileпјҢиҰҒжҳҫзӨәзҡ„жұүеӯ— static arm_2d_tile_t s_tileChar = { .tRegion = { .tSize = { .iWidth = 16, .iHeight = 16, }, }, .tInfo = { .bIsRoot = false, .bDerivedResource = true, .bHasEnforcedColour = true, .tColourInfo = { .chScheme = ARM_2D_COLOUR_BIN, }, }, .ptParent = (arm_2d_tile_t *)&s_tileFont16x16, }; s_tileChar.tRegion.tLocation.iY = chChar * 16; ||еңЁеұҸ幕дёӯжҳҫзӨәзҡ„еҢәеҹҹ arm_2d_region_t tDrawRegion = { .tLocation = {.iX = iX, .iY = iY}, .tSize = s_tileChar.tRegion.tSize, }; ||з»ҳеҲ¶жұүеӯ— arm_2d_rgb16_draw_pattern( &s_tileChar, ptFrameBuffer, &tDrawRegion, ARM_2D_DRW_PATN_MODE_COPY //| ARM_2D_DRW_PATN_MODE_NO_FG_COLOR //| ARM_2D_DRW_PATN_MODE_WITH_BG_COLOR //| ARM_2D_DRW_PATH_MODE_COMP_FG_COLOUR , GLCD_COLOR_GREEN, GLCD_COLOR_BLACK); }жҳҜдёҚжҳҜзңӢеҲ°дәҶзҶҹжӮүзҡ„arm_2d_tile_tзұ»еһӢдәҶ
йҰ–е…ҲжүҫеҲ°дәҶзҲ¶TileпјҲs_tileFont16x16 пјүпјҢе®ғжҳҜж•ҙдёӘеӯ—еә“иө„жәҗпјҢеӯ—еә“ж•°з»„дёәpchBufferжҢҮеҗ‘зҡ„Font_16x16_h
s_tileChar е°ұжҳҜжҲ‘们д»ҠеӨ©зҡ„дё»и§’пјҢиҰҒжҳҫзӨәзҡ„еӯ—з¬ҰеӯҗTileпјҢ
tColourInfo йўңиүІдҝЎжҒҜе’ҢзҲ¶TileдҝқжҢҒдёҖиҮҙгҖӮ
жңҖеҗҺи°ғз”Ёarm_2d_rgb16_draw_patternжҺҘеҸЈз»ҳеҲ¶дёҖдёӘеӯ—з¬Ұ
зЁӢеәҸдёӯз”ЁеҲ°зҡ„з»“жһ„дҪ“е’Ңеӯ—еә“жҲ‘д№ҹиҙҙеҲ°дёӢиҫ№пјҢеҰӮдёӢ
||и®ҫзҪ®жұүеӯ—жҳҫзӨәеқҗж Үvoid My_lcd_text_location(uint8_t chY, uint8_t chX){ s_tLCDTextControl_su.tTextLocation.chX = 0; s_tLCDTextControl_su.tTextLocation.chY = 0; s_tLCDTextControl_su.tRegion.tLocation.iX = chX; s_tLCDTextControl_su.tRegion.tLocation.iY = chY; }||16*16зҡ„жұүеӯ—еӯ—еә“uint8_t Font_16x16_h[]={0x80,0x00,0x84,0x10,0x84,0x10,0xFC,0x1F,0x00,0x04,0x44,0x04,0x44,0x7C,0xFF,0x42,//0;0x44,0x29,0x44,0x08,0x7C,0x08,0x44,0x08,0x44,0x14,0x7C,0x14,0x44,0x22,0x00,0x41,//0;"еөҢ",00x20,0x00,0x40,0x00,0x80,0x00,0x80,0x00,0x80,0x00,0x40,0x01,0x40,0x01,0x40,0x01,//0;0x20,0x02,0x20,0x02,0x10,0x04,0x10,0x04,0x08,0x08,0x04,0x08,0x02,0x10,0x01,0x60,//0;"е…Ҙ",10x00,0x12,0x00,0x22,0x00,0x22,0x00,0x02,0xFF,0x7F,0x00,0x02,0x00,0x02,0x7C,0x02,//0;0x10,0x02,0x10,0x02,0x10,0x04,0x10,0x44,0xF0,0x48,0x1E,0x50,0x04,0x60,0x00,0x40,//0;"ејҸ",20x80,0x00,0x80,0x00,0x80,0x00,0x80,0x00,0x80,0x00,0x88,0x08,0x88,0x10,0x88,0x20,//0;0x84,0x20,0x84,0x40,0x82,0x40,0x81,0x40,0x80,0x00,0x80,0x00,0xA0,0x00,0x40,0x00,//0;"е°Ҹ",30x40,0x04,0x40,0x08,0x40,0x10,0xFC,0x07,0x40,0x04,0x40,0x04,0x40,0x04,0x40,0x04,//0;0xFF,0x3F,0x40,0x20,0x40,0x20,0x40,0x20,0x40,0x20,0x40,0x14,0x40,0x08,0x40,0x00,//0;"д№Ұ",40x80,0x00,0x80,0x00,0x80,0x00,0xFC,0x1F,0x84,0x10,0x84,0x10,0x84,0x10,0x84,0x10,//0;0xFC,0x1F,0x84,0x10,0x80,0x00,0x80,0x08,0x80,0x10,0x80,0x3F,0x7E,0x20,0x00,0x00,//0;"иҷ«",50x00,0x00,0x00,0x00,0xBF,0x3F,0x08,0x00,0x08,0x00,0x08,0x00,0xC8,0x7F,0x3E,0x09,//0;};
||дҝқеӯҳеӯ—еә“дҝЎжҒҜзҡ„з»“жһ„дҪ“/*******************************************typedef struct _GLCD_FONT { uint16_t width; ///< Character width uint16_t height; ///< Character height uint32_t offset; ///< Character offset uint32_t count; ///< Character count const uint8_t *bitmap; ///< Characters bitmaps} const GLCD_FONT;***********************************************/GLCD_FONT GLCD_Font_16x16 = { 16, ///< Character width 16, ///< Character height 32, ///< Character offset 9, ///< Character count Font_16x16_h ///< Characters bitmaps};||дҝқеӯҳе’Ңи®ҫзҪ®жҳҫзӨәеҢәеҹҹзҡ„з»“жһ„дҪ“static struct { arm_2d_region_t tRegion; struct { uint8_t chX; uint8_t chY; } tTextLocation;} s_tLCDTextControl_su = { .tRegion = { .tSize = { .iWidth = GLCD_WIDTH, .iHeight = GLCD_HEIGHT, }, }, .tTextLocation={ .chX = 0, .chY =0, },};е°Ҹз»“
| lcd_puts_chineseеҮҪж•°йҮҢи®Ўз®—еӯ—з¬ҰжҳҫзӨәеқҗж Ү |
| mylcd_draw_charеҮҪж•°йҮҢи®ҫзҪ®еӯ—еә“иө„жәҗе’ҢиҰҒжҳҫзӨәзҡ„еӯ—з¬Ұиө„жәҗпјҲеңЁиҝҷйҮҢи®ҫзҪ®жҲ‘们зҡ„еӯ—еә“пјү |
| и°ғз”Ёarm_2d_rgb16_draw_patternжҺҘеҸЈз»ҳеҲ¶дёҖдёӘеӯ—з¬ҰпјҲеҸҜд»Ҙдҝ®ж”№еӯ—дҪ“йўңиүІпјү |
| GLCD_FONTз»“жһ„дҪ“еҫҲйҮҚиҰҒпјҢдҝ®ж”№еӯ—еә“е°ұжҳҜеңЁиҝҷдёӘзұ»еһӢзҡ„еҸҳйҮҸдёӯдҝ®ж”№ |
дёӢйқўжҲ‘з”ЁArm-2D + жұүеӯ—еӯ—еә“еҲ¶дҪңдәҶдёҖдёӘз®ҖеҚ•зҡ„е°Ҹиҷ«еҗғиҚүзҡ„е°ҸжёёжҲҸпјҢи§Ҷйў‘жј”зӨәеҰӮдёӢ
иЎҘе……
жҲ‘们зҺ°еңЁеҺ»зңӢзңӢArm-2Dзҡ„lcd_putsеҮҪж•°жҳҜжҖҺд№Ҳе®һзҺ°зҡ„еҗ§пјҢйЎәдҫҝд№ҹе’Ңarmе…¬еҸёзҡ„е·ҘзЁӢеёҲеӯҰдәӣзј–зЁӢзҡ„жҠҖе·§пјҢ(*пҝЈпё¶пҝЈ)
lcd_putsеҮҪж•°пјҢеҰӮдёӢ
void lcd_puts(const char *str){ while(*str) { ||еӨ„зҗҶзү№ж®Ҡеӯ—з¬Ұ if (*str == '\r') { s_tLCDTextControl.tTextLocation.chX = 0; } else if (*str == '\n') { s_tLCDTextControl.tTextLocation.chX = 0; s_tLCDTextControl.tTextLocation.chY++; } else if (*str == '\t') { s_tLCDTextControl.tTextLocation.chX += 8; s_tLCDTextControl.tTextLocation.chX &= ~(_BV(3)-1);
if ( s_tLCDTextControl.tTextLocation.chX * GLCD_Font_6x8.width >= s_tLCDTextControl.tRegion.tSize.iWidth ) { s_tLCDTextControl.tTextLocation.chX = 0; s_tLCDTextControl.tTextLocation.chY++; } }else if (*str == '\b') { if (s_tLCDTextControl.tTextLocation.chX) { s_tLCDTextControl.tTextLocation.chX--; } } else { ||и®Ўз®—еӯ—з¬ҰжҳҫзӨәеқҗж Ү int16_t iX = s_tLCDTextControl.tTextLocation.chX * GLCD_Font_6x8.width; int16_t iY = s_tLCDTextControl.tTextLocation.chY * GLCD_Font_6x8.height; ||жҳҫзӨәдёҖдёӘеӯ—з¬Ұ lcd_draw_char( s_tLCDTextControl.tRegion.tLocation.iX + iX, iY, *str); ||еҸіз§»дёҖдёӘеӯ—з¬Ұзҡ„еқҗж ҮпјҢж–№дҫҝдёӢдёӘеӯ—з¬ҰжҳҫзӨә s_tLCDTextControl.tTextLocation.chX++; ||еҲӨж–ӯжҳҜеҗҰжҳҫзӨәеҲ°еұҸ幕еӨ–йқў if ( s_tLCDTextControl.tTextLocation.chX * GLCD_Font_6x8.width >= s_tLCDTextControl.tRegion.tSize.iWidth ) { s_tLCDTextControl.tTextLocation.chX = 0; ||жҳҫзӨәеҲ°дёҖиЎҢзҡ„жң«е°ҫеҗҺжҚўиЎҢ s_tLCDTextControl.tTextLocation.chY++; if ( s_tLCDTextControl.tTextLocation.chY * GLCD_Font_6x8.height >= s_tLCDTextControl.tRegion.tSize.iHeight) { s_tLCDTextControl.tTextLocation.chY = 0; } } } ||жҳҫзӨәе®ҢдёҖдёӘеӯ—з¬ҰпјҢжҢҮеҗ‘дёӢдёҖдёӘеӯ—з¬Ұ str++; }}иҝҷдёӘеҮҪж•°жҜ”жҲ‘们зҡ„й•ҝеӨҡдәҶпјҢдёҚиҝҮжңҖдё»иҰҒзҡ„иҝҳжҳҜи°ғз”Ёlcd_draw_charеҮҪж•°жқҘжҳҫзӨәдёҖдёӘеӯ—з¬Ұ
жҳҜдёҚжҳҜзңӢеҲ°дәҶдјҳз§Җзҡ„д»Јз ҒдәҶпјҢдәә家жҳҫзӨәеҲ°дёҖиЎҢзҡ„жң«е°ҫиҝҳеҸҜд»ҘиҮӘеҠЁжҚўиЎҢпјҢиҝҷж ·жҳҜдёҚжҳҜеҸҜд»Ҙз®ҖеҚ•е®һзҺ°дёҖдёӘtxtзҡ„з”өеӯҗд№Ұйҳ…иҜ»еҷЁдәҶпјҢ(*пҝЈпё¶пҝЈ)
жӣҙеӨҡзІҫеҪ©иҝҳйңҖиҮӘе·ұйҳ…иҜ»жәҗз Ғе“ҲпјҢжәҗз Ғд№ӢдёӢж— з§ҳеҜҶгҖӮ
еӨҮжіЁпјҡжң¬зЁӢеәҸз”ұе®ҳж–№зҡ„lcd_printfеҮҪж•°дҝ®ж”№иҖҢжқҘпјҢж„ҹе…ҙи¶Јзҡ„д№ҹеҸҜд»ҘеҺ»зңӢзңӢе®ҳж–№зҡ„д»Јз ҒпјҢең°еқҖеҰӮдёӢпјҡ
е®ҳж–№Arm-2DејҖжәҗең°еқҖеҰӮдёӢпјҡ https://github.com/ARM-software/EndpointAI еҸӮиҖғж–Ү件гҖҠlcd_printf.cгҖӢ |
еҺҹеҲӣдёҚжҳ“пјҢеҰӮжһңдҪ е–ңж¬ўжҲ‘зҡ„е…¬дј—еҸ·гҖҒи§үеҫ—жҲ‘ ж–Үз« еҜ№дҪ жңүжүҖеҗҜеҸ‘пјҢиҜ·еҠЎеҝ…вҖңзӮ№иөһгҖҒ收и—ҸгҖҒиҪ¬еҸ‘вҖқпјҢиҝҷеҜ№жҲ‘еҫҲйҮҚиҰҒпјҢи°ўи°ўпјҒ
ж¬ўиҝҺи®ўйҳ… еөҢе…ҘејҸе°Ҹд№Ұиҷ«