unityеңЁstm32дёҠзҡ„дҪҝз”Ё
жң¬ж–Үзӣ®ж ҮпјҡunityеңЁstm32дёҠзҡ„дҪҝз”ЁгҖӮ
жҢүз…§жң¬ж–Үзҡ„жҸҸиҝ°пјҢеә”иҜҘеҸҜд»ҘеңЁдҪ жүҖеӨ„зҡ„硬件дёҠи·‘йҖҡд»Јз ҒгҖӮ
е…ҲеҶіжқЎд»¶пјҡиЈ…жңүзј–иҜ‘е’ҢйӣҶжҲҗзҡ„ејҖеҸ‘зҺҜеўғпјҢжҜ”еҰӮпјҡKeil uVision5гҖӮ
жқҝеӯҗ硬件иҰҒжұӮпјҡж— пјҢиҠҜзүҮиҮӘеёҰзҡ„дёІеҸЈеҠҹиғҪеҚіеҸҜе®ҢжҲҗгҖӮ
жәҗз ҒиҺ·еҸ–
Unity жҳҜдёҖдёӘиҪ»йҮҸзә§зҡ„ C иҜӯиЁҖеҚ•е…ғжөӢиҜ•жЎҶжһ¶пјҢе®ғзҡ„и®ҫи®ЎзҗҶеҝөжҳҜз®ҖеҚ•жҳ“з”ЁгҖӮUnity ж”ҜжҢҒжөӢиҜ•еҘ—件е’ҢжөӢиҜ•з”ЁдҫӢпјҢеҗҢж—¶жҸҗдҫӣдәҶдё°еҜҢзҡ„ж–ӯиЁҖеҮҪж•°пјҢеҢ…жӢ¬жҜ”иҫғгҖҒејӮеёёе’Ңж—Ҙеҝ—зӯүгҖӮ
жәҗз Ғе…ҘеҸЈпјҡ
GitHub - ThrowTheSwitch/Unity: Simple Unit Testing for C
https://github.com/ThrowTheSwitch/Unity/
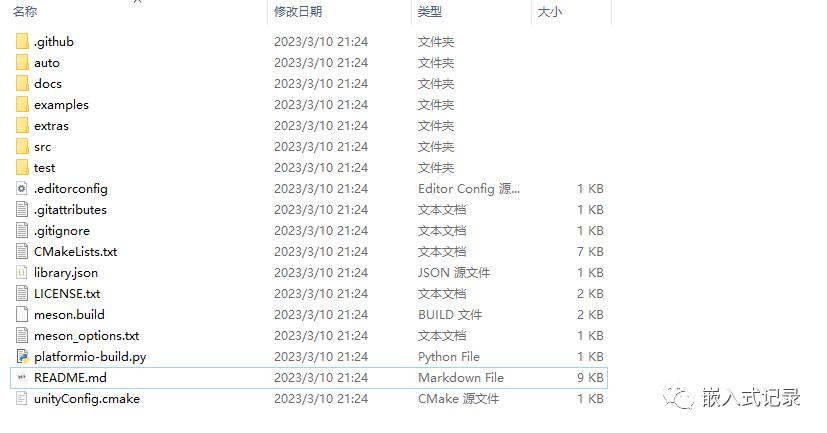
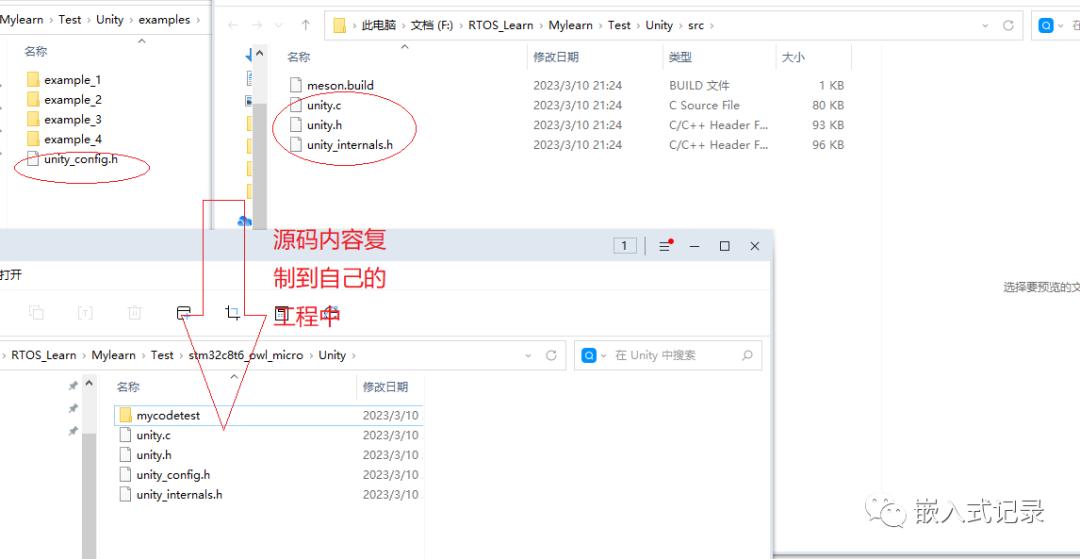
жәҗз ҒйҮҢйқўз»“жһ„пјҢжҺҘдёӢжқҘеҮҶеӨҮдёҖдёӘstm32зҡ„еҹәзЎҖе·ҘзЁӢпјҢжҠҠзӣёе…ід»Јз Ғ移жӨҚиҝӣеҺ»гҖӮ
еҹәзЎҖе·ҘзЁӢ
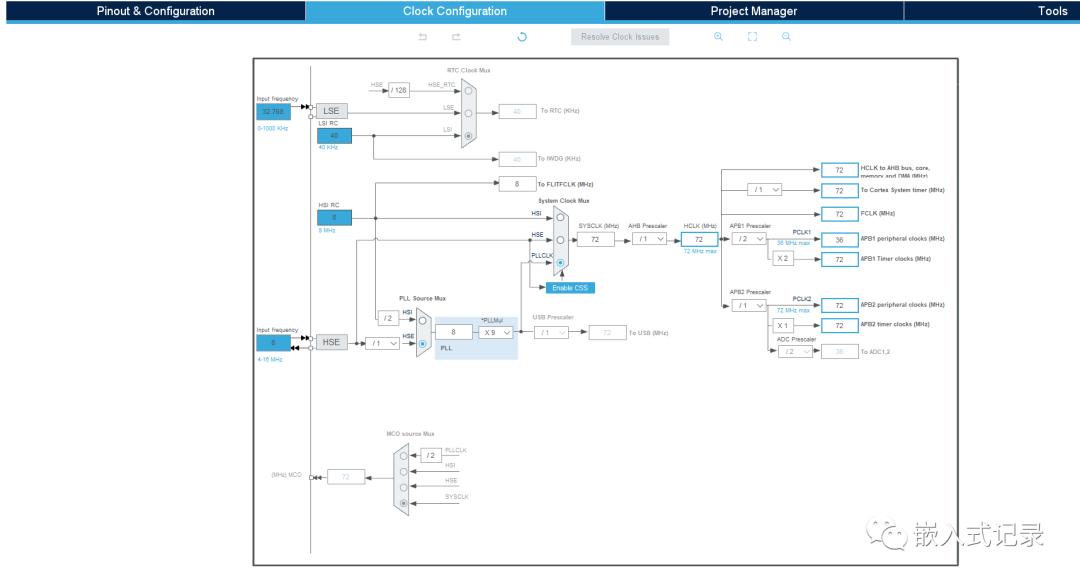
дҪҝз”ЁSTM32CubeMXй…ҚзҪ®stm32зҡ„еҹәжң¬й…ҚзҪ®гҖӮеҹәжң¬зҡ„й…ҚзҪ®еҰӮдёӢпјҡејҖеҗҜswdи°ғиҜ•пјҢејҖеҗҜеӨ–йғЁж—¶й’ҹпјҢејҖеҗҜдёІеҸЈ
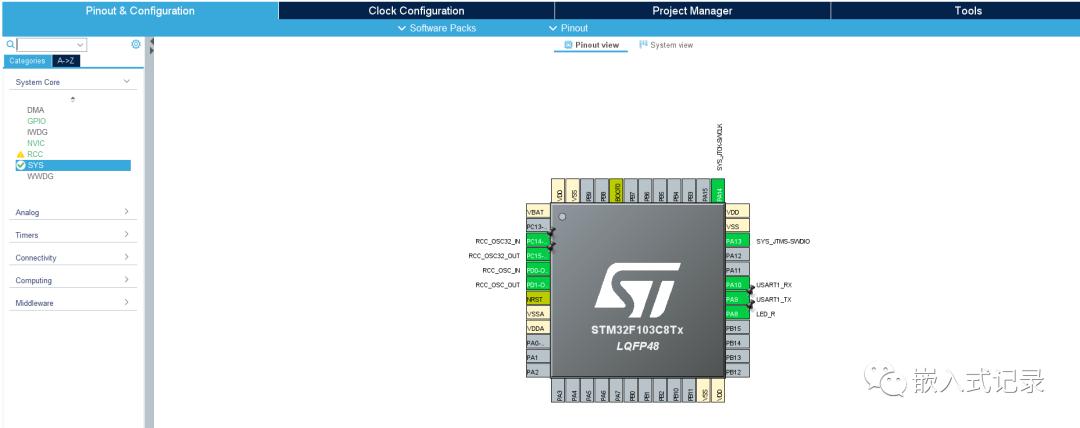
ж—¶й’ҹз•ҢйқўйҖүйЎ№еҚЎпјҡ
е·ҘзЁӢйҖүйЎ№еҚЎпјҡ
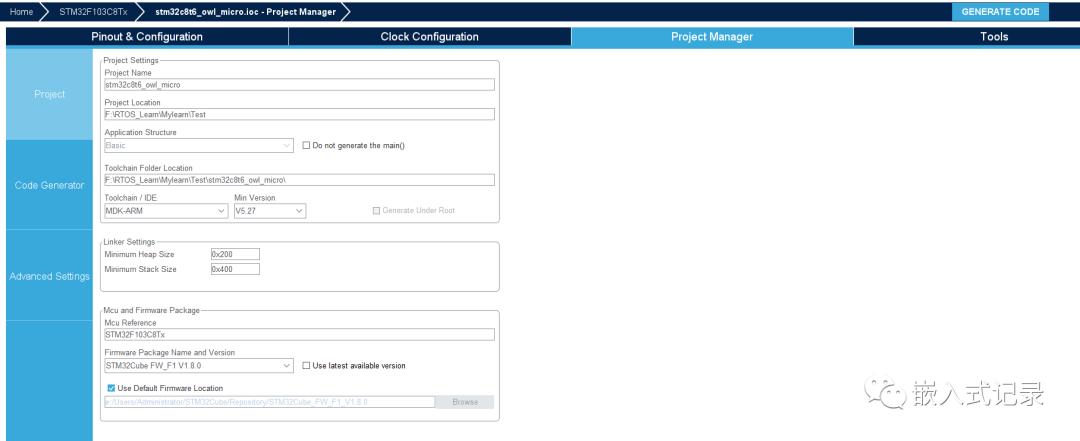
зӮ№еҮ»еҸідёҠи§’зҡ„зҡ„з”ҹжҲҗд»Јз Ғпјҡ

дҪҝз”Ёkeilжү“ејҖе·ҘзЁӢпјҢзј–иҜ‘е·ҘзЁӢпјҢдёҖеҲҮйғҪжҳҜok

ејҖе§Ӣ移жӨҚ
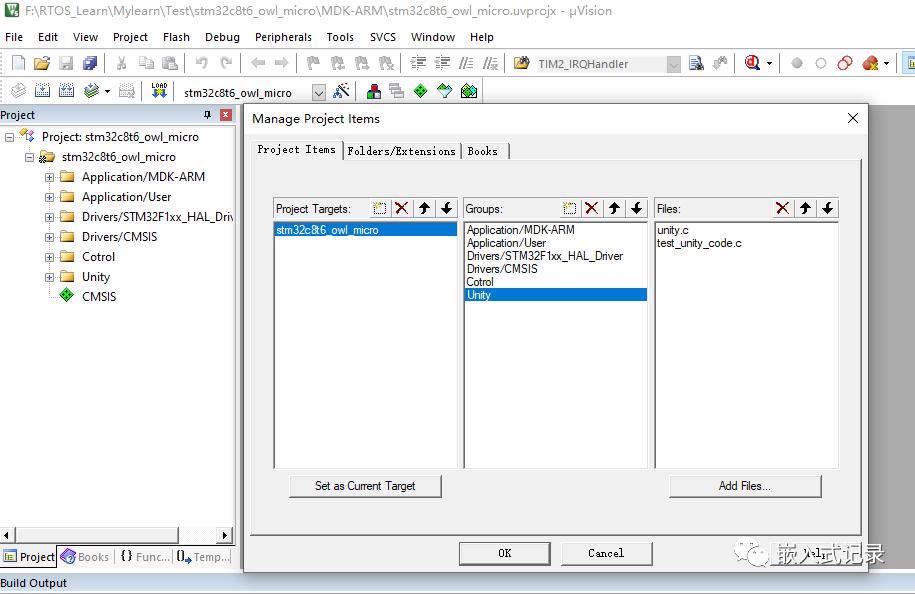
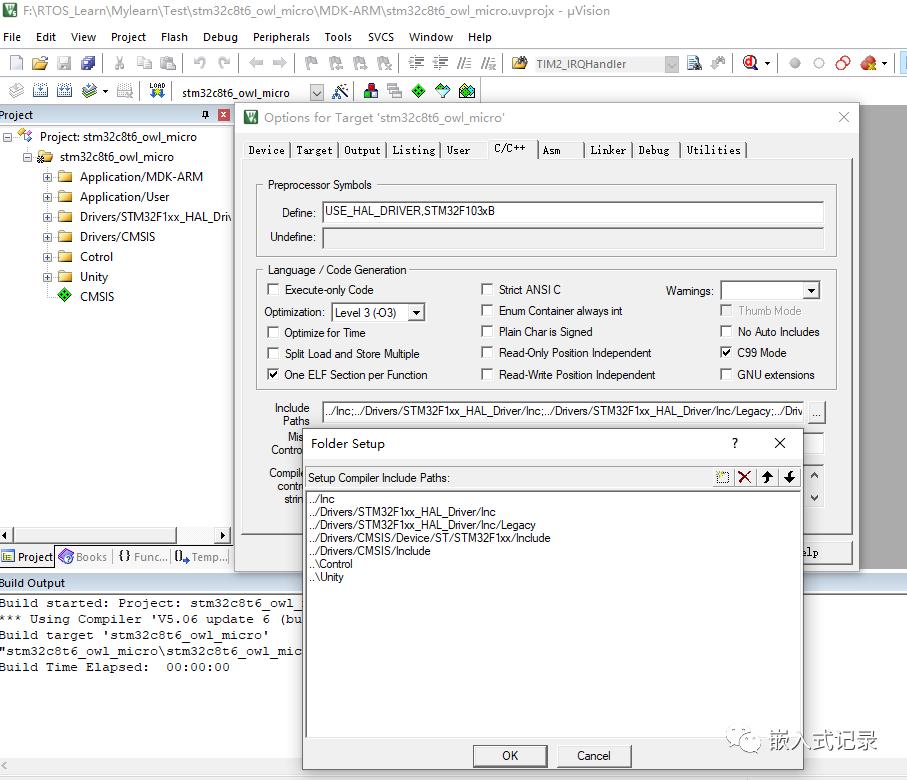
еңЁе·ҘзЁӢдёӯпјҢж–°е»әUnityж–Ү件еӨ№пјҢе°Ҷжәҗз Ғж·»еҠ иҝӣж №ж–Ү件пјҢ然еҗҺж·»еҠ иҝӣе·ҘзЁӢпјҢ并и®ҫзҪ®еҜ№еә”зҡ„зј–иҜ‘и·Ҝеҫ„пјҢе…¶дёӯtest_unity_conde.cжҳҜжҲ‘иҮӘе·ұж–°е»әзҡ„еҶ…е®№гҖӮ
и®ҫзҪ®еӨҙж–Ү件и·Ҝеҫ„пјҡ
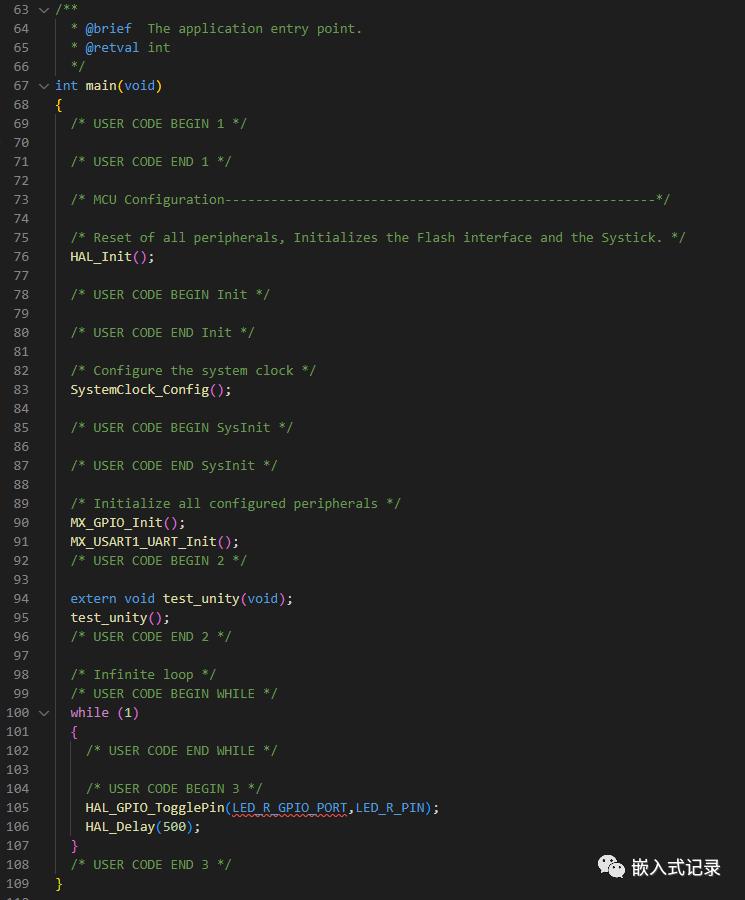
еңЁmain.cдёӯпјҢж·»еҠ дёІеҸЈжҳ е°„д»Јз ҒпјҢдҪҝз”Ёprintf
/* USER CODE BEGIN 4 */ /* With GCC/RAISONANCE, small printf (option LD Linker->Libraries->Small printf set to 'Yes') calls __io_putchar() */ /** * @brief Retargets the C library printf function to the USART. * @param None * @retval None */PUTCHAR_PROTOTYPE{ /* Place your implementation of fputc here */ /* e.g. write a character to the EVAL_COM1 and Loop until the end of transmission */ HAL_UART_Transmit(&huart1, (uint8_t *)&ch, 1, 0xFFFF); return ch;} int fgetc(FILE * f){ uint8_t ch = 0; HAL_UART_Receive(&huart1, (uint8_t *)&ch, 1, 0xffff); return ch;}
/* USER CODE END 4 */зј–иҜ‘д»Јз ҒпјҢжҠҘй”ҷпјҢж–°е»әдёҖдёӘиҮӘе·ұзҡ„test_unity_conde.cжәҗз ҒпјҢж·»еҠ жҠҘй”ҷзҡ„иҝҷдёӨдёӘеҮҪж•°еҚіеҸҜзј–иҜ‘йҖҡиҝҮгҖӮ

main.cдёӯзҡ„д»Јз Ғпјҡ
unity_config.hй…ҚзҪ®дёӯеҶ…е®№пјҡ
/* Unity Configuration * As of May 11th, 2016 at ThrowTheSwitch/Unity commit 837c529 * Update: December 29th, 2016 * See Also: Unity/docs/UnityConfigurationGuide.pdf * * Unity is designed to run on almost anything that is targeted by a C compiler. * It would be awesome if this could be done with zero configuration. While * there are some targets that come close to this dream, it is sadly not * universal. It is likely that you are going to need at least a couple of the * configuration options described in this document. * * All of Unity's configuration options are `#defines`. Most of these are simple * definitions. A couple are macros with arguments. They live inside the * unity_internals.h header file. We don't necessarily recommend opening that * file unless you really need to. That file is proof that a cross-platform * library is challenging to build. From a more positive perspective, it is also * proof that a great deal of complexity can be centralized primarily to one * place in order to provide a more consistent and simple experience elsewhere. * * Using These Options * It doesn't matter if you're using a target-specific compiler and a simulator * or a native compiler. In either case, you've got a couple choices for * configuring these options: * * 1. Because these options are specified via C defines, you can pass most of * these options to your compiler through command line compiler flags. Even * if you're using an embedded target that forces you to use their * overbearing IDE for all configuration, there will be a place somewhere in * your project to configure defines for your compiler. * 2. You can create a custom `unity_config.h` configuration file (present in * your toolchain's search paths). In this file, you will list definitions * and macros specific to your target. All you must do is define * `UNITY_INCLUDE_CONFIG_H` and Unity will rely on `unity_config.h` for any * further definitions it may need. */
/* ************************* AUTOMATIC INTEGER TYPES *************************** * C's concept of an integer varies from target to target. The C Standard has * rules about the `int` matching the register size of the target * microprocessor. It has rules about the `int` and how its size relates to * other integer types. An `int` on one target might be 16 bits while on another * target it might be 64. There are more specific types in compilers compliant * with C99 or later, but that's certainly not every compiler you are likely to * encounter. Therefore, Unity has a number of features for helping to adjust * itself to match your required integer sizes. It starts off by trying to do it * automatically. **************************************************************************** */
/* The first attempt to guess your types is to check `limits.h`. Some compilers * that don't support `stdint.h` could include `limits.h`. If you don't * want Unity to check this file, define this to make it skip the inclusion. * Unity looks at UINT_MAX & ULONG_MAX, which were available since C89. */
/* The second thing that Unity does to guess your types is check `stdint.h`. * This file defines `UINTPTR_MAX`, since C99, that Unity can make use of to * learn about your system. It's possible you don't want it to do this or it's * possible that your system doesn't support `stdint.h`. If that's the case, * you're going to want to define this. That way, Unity will know to skip the * inclusion of this file and you won't be left with a compiler error. *//* #define UNITY_EXCLUDE_STDINT_H */
/* ********************** MANUAL INTEGER TYPE DEFINITION *********************** * If you've disabled all of the automatic options above, you're going to have * to do the configuration yourself. There are just a handful of defines that * you are going to specify if you don't like the defaults. **************************************************************************** */
/* Define this to be the number of bits an `int` takes up on your system. The * default, if not auto-detected, is 32 bits. * * Example: *//* #define UNITY_INT_WIDTH 16 */
/* Define this to be the number of bits a `long` takes up on your system. The * default, if not autodetected, is 32 bits. This is used to figure out what * kind of 64-bit support your system can handle. Does it need to specify a * `long` or a `long long` to get a 64-bit value. On 16-bit systems, this option * is going to be ignored. * * Example: *//* #define UNITY_LONG_WIDTH 16 */
/* Define this to be the number of bits a pointer takes up on your system. The * default, if not autodetected, is 32-bits. If you're getting ugly compiler * warnings about casting from pointers, this is the one to look at. * * Example: */
/* Unity will automatically include 64-bit support if it auto-detects it, or if * your `int`, `long`, or pointer widths are greater than 32-bits. Define this * to enable 64-bit support if none of the other options already did it for you. * There can be a significant size and speed impact to enabling 64-bit support * on small targets, so don't define it if you don't need it. *//* #define UNITY_INCLUDE_64 */
/* *************************** FLOATING POINT TYPES **************************** * In the embedded world, it's not uncommon for targets to have no support for * floating point operations at all or to have support that is limited to only * single precision. We are able to guess integer sizes on the fly because * integers are always available in at least one size. Floating point, on the * other hand, is sometimes not available at all. Trying to include `float.h` on * these platforms would result in an error. This leaves manual configuration as * the only option. **************************************************************************** */
/* By default, Unity guesses that you will want single precision floating point * support, but not double precision. It's easy to change either of these using * the include and exclude options here. You may include neither, just float, * or both, as suits your needs. */ /* #define UNITY_EXCLUDE_DOUBLE */
/* For features that are enabled, the following floating point options also * become available. */
/* Unity aims for as small of a footprint as possible and avoids most standard * library calls (some embedded platforms don't have a standard library!). * Because of this, its routines for printing integer values are minimalist and * hand-coded. To keep Unity universal, though, we eventually chose to develop * our own floating point print routines. Still, the display of floating point * values during a failure are optional. By default, Unity will print the * actual results of floating point assertion failures. So a failed assertion * will produce a message like "Expected 4.0 Was 4.25". If you would like less * verbose failure messages for floating point assertions, use this option to * give a failure message `"Values Not Within Delta"` and trim the binary size. *//* #define UNITY_EXCLUDE_FLOAT_PRINT */
/* If enabled, Unity assumes you want your `FLOAT` asserts to compare standard C * floats. If your compiler supports a specialty floating point type, you can * always override this behavior by using this definition. * * Example: *//* #define UNITY_FLOAT_TYPE float16_t */
/* If enabled, Unity assumes you want your `DOUBLE` asserts to compare standard * C doubles. If you would like to change this, you can specify something else * by using this option. For example, defining `UNITY_DOUBLE_TYPE` to `long * double` could enable gargantuan floating point types on your 64-bit processor * instead of the standard `double`. * * Example: *//* #define UNITY_DOUBLE_TYPE long double */
/* If you look up `UNITY_ASSERT_EQUAL_FLOAT` and `UNITY_ASSERT_EQUAL_DOUBLE` as * documented in the Unity Assertion Guide, you will learn that they are not * really asserting that two values are equal but rather that two values are * "close enough" to equal. "Close enough" is controlled by these precision * configuration options. If you are working with 32-bit floats and/or 64-bit * doubles (the normal on most processors), you should have no need to change * these options. They are both set to give you approximately 1 significant bit * in either direction. The float precision is 0.00001 while the double is * 10^-12. For further details on how this works, see the appendix of the Unity * Assertion Guide. * * Example: *//* #define UNITY_FLOAT_PRECISION 0.001f *//* #define UNITY_DOUBLE_PRECISION 0.001f */
/* *************************** MISCELLANEOUS *********************************** * Miscellaneous configuration options for Unity **************************************************************************** */
/* Unity uses the stddef.h header included in the C standard library for the * "NULL" macro. Define this in order to disable the include of stddef.h. If you * do this, you have to make sure to provide your own "NULL" definition. *//* #define UNITY_EXCLUDE_STDDEF_H */
/* Define this to enable the unity formatted print macro: * "TEST_PRINTF" *//* #define UNITY_INCLUDE_PRINT_FORMATTED */
/* *************************** TOOLSET CUSTOMIZATION *************************** * In addition to the options listed above, there are a number of other options * which will come in handy to customize Unity's behavior for your specific * toolchain. It is possible that you may not need to touch any of these but * certain platforms, particularly those running in simulators, may need to jump * through extra hoops to operate properly. These macros will help in those * situations. **************************************************************************** */
/* By default, Unity prints its results to `stdout` as it runs. This works * perfectly fine in most situations where you are using a native compiler for * testing. It works on some simulators as well so long as they have `stdout` * routed back to the command line. There are times, however, where the * simulator will lack support for dumping results or you will want to route * results elsewhere for other reasons. In these cases, you should define the * `UNITY_OUTPUT_CHAR` macro. This macro accepts a single character at a time * (as an `int`, since this is the parameter type of the standard C `putchar` * function most commonly used). You may replace this with whatever function * call you like. * * Example: * Say you are forced to run your test suite on an embedded processor with no * `stdout` option. You decide to route your test result output to a custom * serial `RS232_putc()` function you wrote like thus: *//* #define UNITY_OUTPUT_CHAR(a) RS232_putc(a) *//* #define UNITY_OUTPUT_CHAR_HEADER_DECLARATION RS232_putc(int) *//* #define UNITY_OUTPUT_FLUSH() RS232_flush() *//* #define UNITY_OUTPUT_FLUSH_HEADER_DECLARATION RS232_flush(void) *//* #define UNITY_OUTPUT_START() RS232_config(115200,1,8,0) *//* #define UNITY_OUTPUT_COMPLETE() RS232_close() */
/* Some compilers require a custom attribute to be assigned to pointers, like * `near` or `far`. In these cases, you can give Unity a safe default for these * by defining this option with the attribute you would like. * * Example: *//* #define UNITY_PTR_ATTRIBUTE __attribute__((far)) *//* #define UNITY_PTR_ATTRIBUTE near */
/* Print execution time of each test when executed in verbose mode * * Example: * * TEST - PASS (10 ms) *//* #define UNITY_INCLUDE_EXEC_TIME */
test_unity_code.cдёӯзҡ„еҶ…е®№пјҡ
void setUp(void){} void tearDown(void){} /* й—°е№ҙеҲӨж–ӯеҮҪж•° й—°е№ҙпјҡиғҪиў«4ж•ҙйҷӨеҗҢж—¶дёҚиғҪиў«100ж•ҙйҷӨпјҢжҲ–иҖ…иғҪиў«400ж•ҙйҷӨгҖӮ*/int IsLeapYear(int year){ uint8_t flag = 0; if(((year % 100!=0) && (year % 4==0)) || ( year % 400==0) ) { flag = 1; } return flag;} void leapYear(void){ TEST_ASSERT_TRUE(IsLeapYear(2020)); TEST_ASSERT_TRUE(IsLeapYear(2000));} void commonYear(void){ TEST_ASSERT_FALSE(IsLeapYear(1999)); TEST_ASSERT_FALSE(IsLeapYear(2100));} // иў«жөӢеҮҪж•°int add(int a, int b) { return a + b;}
// жөӢиҜ•еҮҪж•°void test_add(void) { TEST_ASSERT_EQUAL(4, add(2, 2)); TEST_ASSERT_EQUAL(0, add(0, 0)); TEST_ASSERT_EQUAL(0, add(-1, 1));}
// иў«жөӢеҮҪж•°void led_on(uint8_t *gpio_state) { // и®ҫзҪ®GPIOеј•и„ҡдёәдҪҺз”өе№іпјҢзӮ№дә®LEDзҒҜ *gpio_state = 0;}
void led_off(uint8_t *gpio_state) { // и®ҫзҪ®GPIOеј•и„ҡдёәй«ҳз”өе№іпјҢзҶ„зҒӯLEDзҒҜ *gpio_state = 1;}
// жөӢиҜ•еҮҪж•°void test_led_off(void) { // жЁЎжӢҹGPIOеј•и„ҡзҡ„зҠ¶жҖҒ uint8_t gpio_state = 0;
// и°ғз”Ёиў«жөӢеҮҪж•°д№ӢеүҚпјҢжЈҖжҹҘGPIOеј•и„ҡдёәдҪҺз”өе№і TEST_ASSERT_EQUAL(0, gpio_state);
// и°ғз”Ёиў«жөӢеҮҪж•°пјҢе№¶дј е…ҘдёҖдёӘжҢҮй’ҲеҸӮж•°пјҢз”ЁдәҺдҝ®ж”№GPIOеј•и„ҡзҡ„зҠ¶жҖҒ led_off(&gpio_state);
// и°ғз”Ёиў«жөӢеҮҪж•°д№ӢеҗҺпјҢжЈҖжҹҘGPIOеј•и„ҡдёәй«ҳз”өе№і TEST_ASSERT_EQUAL(1, gpio_state);}
void test_led_on(void) { // жЁЎжӢҹGPIOеј•и„ҡзҡ„зҠ¶жҖҒ uint8_t gpio_state = 1;
// и°ғз”Ёиў«жөӢеҮҪж•°д№ӢеүҚпјҢжЈҖжҹҘGPIOеј•и„ҡдёәй«ҳз”өе№і TEST_ASSERT_EQUAL(1, gpio_state);
// и°ғз”Ёиў«жөӢеҮҪж•°пјҢе№¶дј е…ҘдёҖдёӘжҢҮй’ҲеҸӮж•°пјҢз”ЁдәҺдҝ®ж”№GPIOеј•и„ҡзҡ„зҠ¶жҖҒ led_on(&gpio_state);
// и°ғз”Ёиў«жөӢеҮҪж•°д№ӢеҗҺпјҢжЈҖжҹҘGPIOеј•и„ҡдёәдҪҺз”өе№і TEST_ASSERT_EQUAL(0, gpio_state);}
// иў«жөӢеҮҪж•°void reverse_string(char *str) { // еҸҚиҪ¬дёҖдёӘеӯ—з¬ҰдёІ int len = strlen(str); for (int i = 0; i < len / 2; i++) { char temp = str[i]; str[i] = str[len - i - 1]; str[len - i - 1] = temp; }}
// жөӢиҜ•еҮҪж•°void test_reverse_string(void) { // е®ҡд№үдёҖдёӘжөӢиҜ•еӯ—з¬ҰдёІ char test_str[] = "Hello World";
// и°ғз”Ёиў«жөӢеҮҪж•°д№ӢеүҚпјҢжЈҖжҹҘеӯ—з¬ҰдёІеҶ…е®№ TEST_ASSERT_EQUAL_STRING("Hello World", test_str);
// и°ғз”Ёиў«жөӢеҮҪж•°пјҢе№¶дј е…Ҙеӯ—з¬ҰдёІеҸӮж•° reverse_string(test_str);
// и°ғз”Ёиў«жөӢеҮҪж•°д№ӢеҗҺпјҢжЈҖжҹҘеӯ—з¬ҰдёІеҶ…е®№жҳҜеҗҰеҸҚиҪ¬ TEST_ASSERT_EQUAL_STRING("dlroW olleH", test_str);}
void test_unity(void){// UnityPrint("heihei\r\n");// UnityPrint("\r\n************\r\n");
// еҲқе§ӢеҢ–жөӢиҜ•жіЁеҶҢиЎЁ UNITY_BEGIN();
// иҝҗиЎҢжөӢиҜ•еҮҪж•° RUN_TEST(test_add); RUN_TEST(leapYear); RUN_TEST(commonYear); RUN_TEST(test_led_on); RUN_TEST(test_led_off); RUN_TEST(test_reverse_string);
UNITY_END();}е®һйӘҢзҺ°иұЎ
зј–иҜ‘е·ҘзЁӢпјҡдёӢиҪҪиҝӣе·ҘзЁӢпјҢеҸҜд»ҘеңЁдёІеҸЈеҠ©жүӢз•Ңйқўи§ӮеҜҹеҲ°зӣёе…іж—Ҙеҝ—гҖӮ
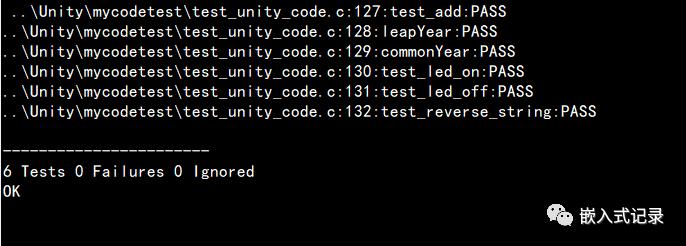
еҸҜд»ҘеңЁе·ҘзЁӢдёӯи·‘дёҖдёӢе®ҳж–№зҡ„demoпјҢи§ӮеҜҹдёҖдёӢе®һйӘҢзҺ°иұЎпјҢжң¬ж–Үе®ҢпјҒ