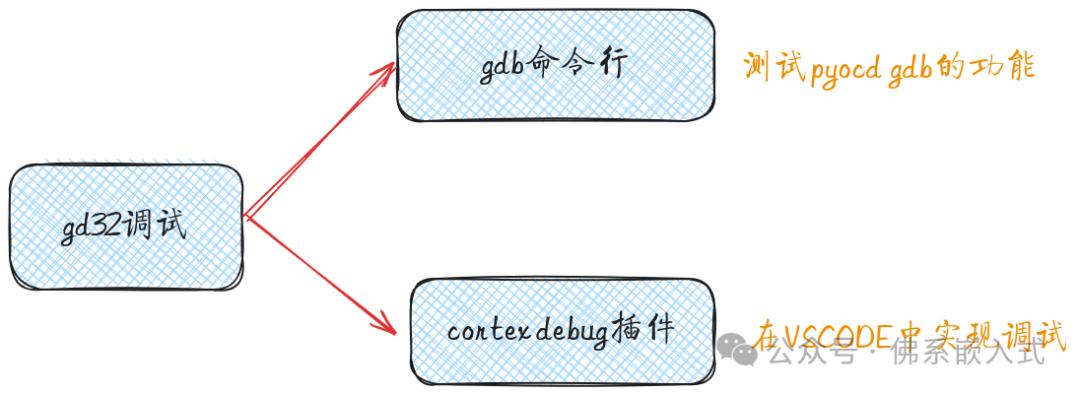
gdbе‘Ҫд»ӨиЎҢи°ғиҜ•
1. ејҖеҗҜgdbжңҚеҠЎеҷЁ
2. еҲ©з”Ёarm-none-eabi-gdbиҝһжҺҘеҲ°GDB server
еңЁvsodeдёӯи°ғиҜ•
1. жҸ’件е®үиЈ…
2. жҸ’件й…ҚзҪ®
3. и°ғиҜ•й…ҚзҪ®
4. еҗҜеҠЁи°ғиҜ•
еүҚйқўе®һзҺ°дәҶпјҢзј–иҜ‘е’ҢдёӢиҪҪпјҢеҶҚе®һзҺ°и°ғиҜ•еҠҹиғҪе°ұиғҪеңЁlinuxдёӢејҖеҸ‘gd32дәҶгҖӮи°ғиҜ•зҡ„иҜқиҝҳжҳҜзҡ„еҲ©з”ЁpyocdгҖӮ
жң¬ж¬Ўж“ҚдҪңеқҮдёәеҹәзЎҖж“ҚдҪңпјҢжІЎжңүеҒҡж·ұе…ҘдәҶи§Ј
gdbе‘Ҫд»ӨиЎҢи°ғиҜ•
1. ејҖеҗҜgdbжңҚеҠЎеҷЁ
pyocd gdb
з»Ҳз«Ҝиҫ“еҮәз»“жһң
0000418 W Board ID lckf is not recognized [mbed_board]
0000445 I Target type is gd32f470zg [board]
0000703 I DP IDR = 0x2ba01477 (v1 rev2) [dap]
0000724 I AHB-AP#0 IDR = 0x24770011 (AHB-AP var1 rev2) [discovery]
0000733 I AHB-AP#0 Class 0x1 ROM table #0 @ 0xe00ff000 (designer=751 part=357) [rom_table]
0000738 I [0]<e000e000:SCS v7-M class=14 designer=43b:Arm part=00c> [rom_table]
0000742 I [1]<e0001000:DWT v7-M class=14 designer=43b:Arm part=002> [rom_table]
0000745 I [2]<e0002000:FPB v7-M class=14 designer=43b:Arm part=003> [rom_table]
0000748 I [3]<e0000000:ITM v7-M class=14 designer=43b:Arm part=001> [rom_table]
0000754 I [4]<e0040000:TPIU M4 class=9 designer=43b:Arm part=9a1 devtype=11 archid=0000 devid=ca1:0:0> [rom_table]
0000758 W Invalid coresight component, cidr=0x0 [rom_table]
0000758 I [5]e0041000: cidr=0, pidr=0, component invalid> [rom_table]
0000768 I CPU core #0: Cortex-M4 r0p1, v7.0-M architecture [cortex_m]
0000768 I   Extensions: [DSP, FPU, FPU_V4, MPU] [cortex_m]
0000768 I   FPU present: FPv4-SP-D16-M [cortex_m]
0000771 I Setting core #0 (Cortex-M4) default reset sequence to ResetSystem [pack_target]
0000776 I 4 hardware watchpoints [dwt]
0000780 I 6 hardware breakpoints, 4 literal comparators [fpb]
0000802 I Semihost server started on port 4444 (core 0) [server]
0000918 I GDB server started on port 3333 (core 0) [gdbserver]
д»Һз»Ҳз«ҜеҸҜд»ҘзңӢеҮәGDB serverзҡ„з«ҜеҸЈдёә3333.
2. еҲ©з”Ёarm-none-eabi-gdbиҝһжҺҘеҲ°GDB server
bashrcexport PATH=$PATH:/home/haijun/software/gcc-arm-none-eabi/gcc-arm-none-eabi-10-2020-q4-major/bin
еҸҜд»ҘйҖҡиҝҮеңЁз»Ҳз«ҜиҝҗиЎҢarm-none-eabi-gdb -versionжҹҘзңӢжҳҜеҗҰж·»еҠ жҲҗеҠҹгҖӮ
第дёҖж¬ЎиҝҗиЎҢеҸҜиғҪжҠҘй”ҷ
arm-none-eabi-gdb: error while loading shared libraries: libncurses.so.5: cannot open shared object file: No such file or directory
зјәе°‘еә“:
sudo apt install libncurses
arm-none-eabi-gdb build/gd32f470BaseProject.elfејҖеҗҜgdbпјҢејҖеҗҜжҲҗеҠҹз»Ҳз«ҜдјҡеҮәзҺ°(gdb)target remote localhost:3333иҝһжҺҘеҲ°жңҚеҠЎеҷЁgdbеӨ„зҡ„з»Ҳз«ҜжҳҫзӨәпјҡ
Remote debugging using localhost:3333
0x08000740 in delay_1ms (count=500) at /home/haijun/жЎҢйқў/gd32f470_project_cmake/user/systick.c:68
68 while(0U != delay) {
(gdb)
pyocd GDB serverdз«ҜжҳҫзӨәпјҡ
0658343 I Client connected to port 3333! [gdbserver]
0658536 I Attempting to load RTOS plugins [gdbserver]
иҜҘдёӨеӨ„жҳҫзӨәgdbиҝһжҺҘжҲҗеҠҹгҖӮдёӢйқўе°ұеҸҜд»ҘејҖе§Ӣи°ғиҜ•дәҶ
- еңЁmainеҮҪж•°еӨ„ж·»еҠ ж–ӯзӮ№пјҡ
b main
(gdb) b main
Breakpoint 1 at 0x8000610: file /home/haijun/жЎҢйқў/gd32f470_project_cmake/user/main.c, line 18.
Note: automatically using hardware breakpoints for read-only addresses.
- иҝҗиЎҢ
c
(gdb) c
Continuing.
е…¶д»–зҡ„е‘Ҫд»Өе°ұдёҚжҺўзҙўдәҶпјҢжҜ•з«ҹжІЎжңүжү“з®—дҪҝз”Ёе‘Ҫд»ӨиЎҢи°ғиҜ•гҖӮеҸӘжҳҜйӘҢиҜҒpyocdжҳҜеҸҜд»Ҙи°ғиҜ•зҡ„гҖӮ
еңЁvsodeдёӯи°ғиҜ•
еңЁvsodeдёӯеҖҹеҠ©cortex debugжҸ’件иҝӣиЎҢи°ғиҜ•
1. жҸ’件е®үиЈ…

2. жҸ’件й…ҚзҪ®
- и®ҫзҪ®еҲ·ж–°зҺҮпјӣ
- и®ҫзҪ®дәӨеҸүзј–иҜ‘и·Ҝеҫ„пјӣ
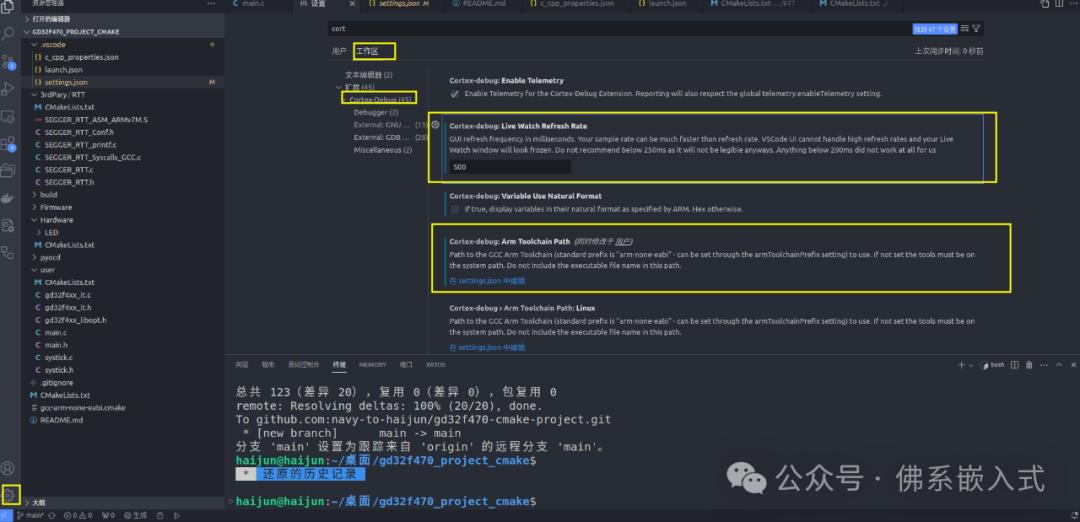
д»ҘдёҠи®ҫзҪ®дјҡеңЁsetting.jsonзңӢеҲ°
{
    "cortex-debug.liveWatchRefreshRate": 500,
    "cortex-debug.armToolchainPath": "/home/haijun/software/gcc-arm-none-eabi/gcc-arm-none-eabi-10-2020-q4-major/bin",
    "cortex-debug.variableUseNaturalFormat": false
}
3. и°ғиҜ•й…ҚзҪ®
и°ғиҜ•зҡ„й…ҚзҪ®еңЁlaunch.jsonдёӯ
{
// дҪҝз”Ё IntelliSense дәҶи§Јзӣёе…іеұһжҖ§гҖӮ
// жӮ¬еҒңд»ҘжҹҘзңӢзҺ°жңүеұһжҖ§зҡ„жҸҸиҝ°гҖӮ
// ж¬ІдәҶи§ЈжӣҙеӨҡдҝЎжҒҜпјҢиҜ·и®ҝй—®: https://go.microsoft.com/fwlink/?linkid=830387
"version": "0.2.0",
"configurations": [
{
"name": "GD32 Debug with PyOCD",
"cwd": "${workspaceRoot}",
"executable": "./build/gd32f470BaseProject.elf",
"request": "launch",
"type": "cortex-debug",
"runToEntryPoint": "main",
"servertype": "pyocd",
"targetId":"gd32f470zg",
"showDevDebugOutput": "both",
"cmsisPack": "./pyocd/GigaDevice.GD32F4xx_DFP.3.2.0.pack"
}
]
}
cwdпјҡжҢҮе®ҡе‘Ҫд»ӨиҝҗиЎҢзҡ„и·Ҝеҫ„пјҢе·ҘзЁӢж №зӣ®еҪ•пјӣexecutableпјҡжҢҮе®ҡеҸҜжү§иЎҢж–Ү件и·Ҝеҫ„runToEntryPointпјҡжҢҮе®ҡд»ҺmainеҮҪж•°ејҖе§Ӣи°ғиҜ•servertypeпјҡжҢҮе®ҡдҪҝз”ЁpyocdдҪңдёәжңҚеҠЎеҷЁtargetIdпјҡжҢҮе®ҡиҠҜзүҮзұ»еһӢcmsisPackпјҡжҢҮе®ҡpackеҢ…пјӣ
еҗҺйқўеҮ дёӘй…ҚзҪ®жҳҜpyocdзү№жңүзҡ„гҖӮ
4. еҗҜеҠЁи°ғиҜ•
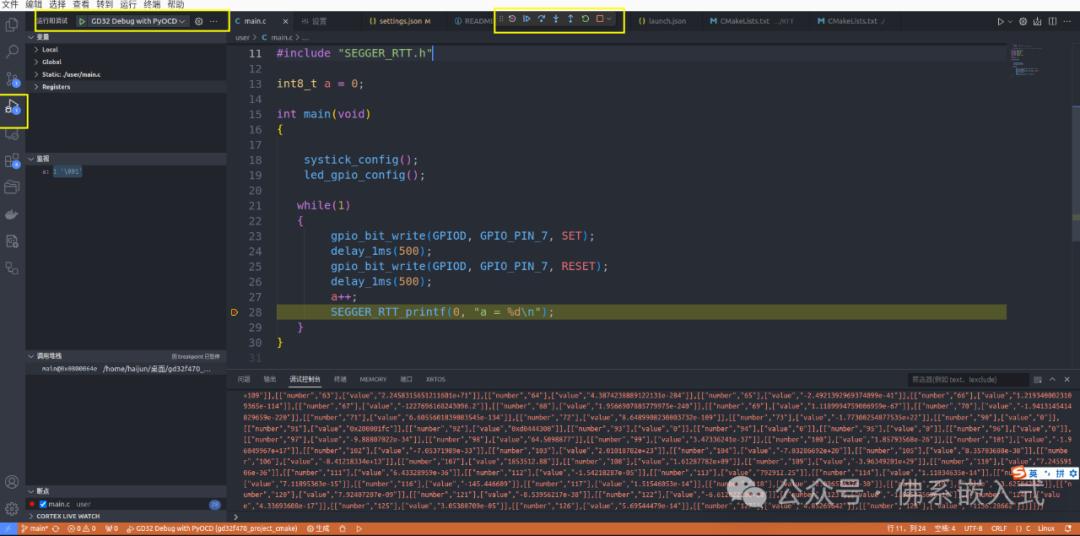
еңЁvsodeдёӯзҡ„и°ғиҜ•жІЎжңүIARйӮЈд№ҲиҲ’жңҚпјҢдҪҶжҳҜиғҪз”ЁгҖӮ
еңЁlinuxдёӢеҜ№gd32зҡ„й…ҚзҪ®е°ұз®—е®ҢдәӢдәҶпјҢеҗҺйқўе°ұеҸҜд»ҘејҖеҗҜзј–зЁӢгҖӮзӣ®еүҚжғіз”Ёgd32йҖҡиҝҮеұҸ幕е®һзҺ°жүӢеҶҷдҪ“зҡ„иҜҶеҲ«пјҢеҮӯеҖҹе®ғ240MHzзҡ„дё»йў‘пјҢдј°и®ЎиғҪж•ҲжһңиҝҳиЎҢеҗ§гҖӮ